What Is the CapCut Timeline and How Does It Work? (Beginner Guide)
The CapCut timeline is the sequencing workspace where you arrange clips and make time-based edits, using a playhead to target exact moments for cuts, adjustments, and exports. If you’re new to CapCut or need the latest Android version before editing, you can always download the official CapCut APK from the main site.
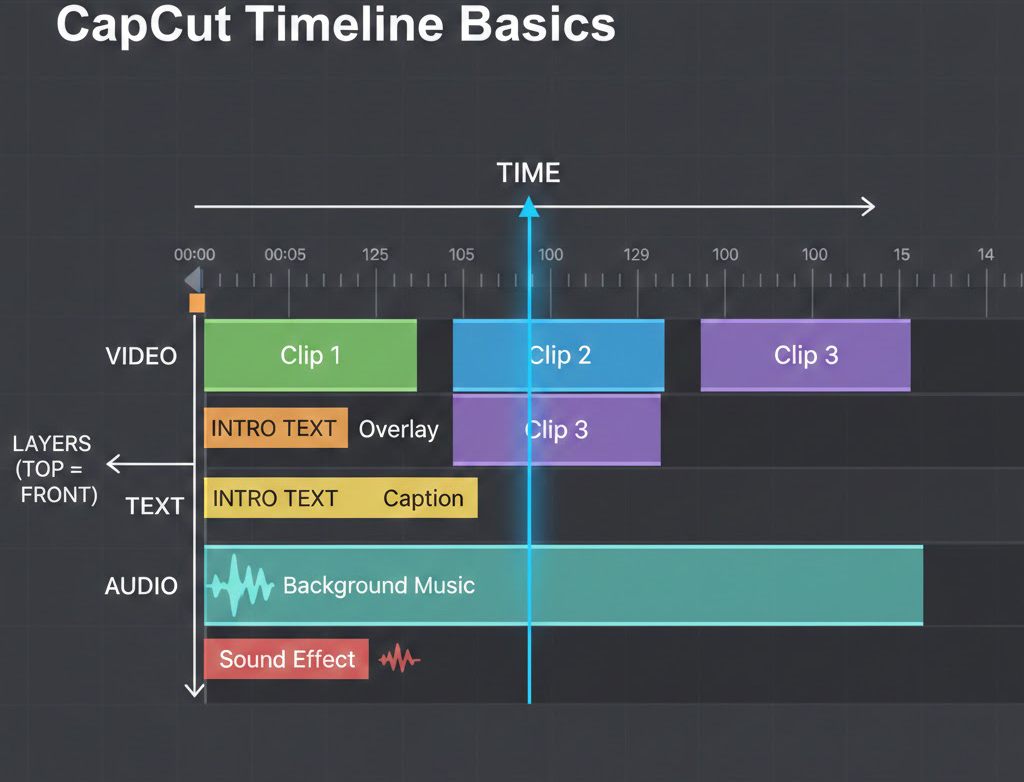
At a practical level, the timeline is a set of tracks (for video, overlays, text, and audio) plus a playhead that indicates the current frame you are viewing or editing. When you drag clips onto the timeline, you are committing to a time structure: order, duration, and layer priority become the “source of truth” for everything downstream, including transitions, effects, filters, and captions. If you treat the timeline as a map of intent (what the viewer should see and hear at each second), your edits stop being “operations” and start being deliberate decisions. If certain timeline tools look missing, outdated, or behave differently on your Android device, it may be related to update issues rather than editing mistakes.
CapCut PC vs Mobile vs Web: Does the Timeline Work Differently?
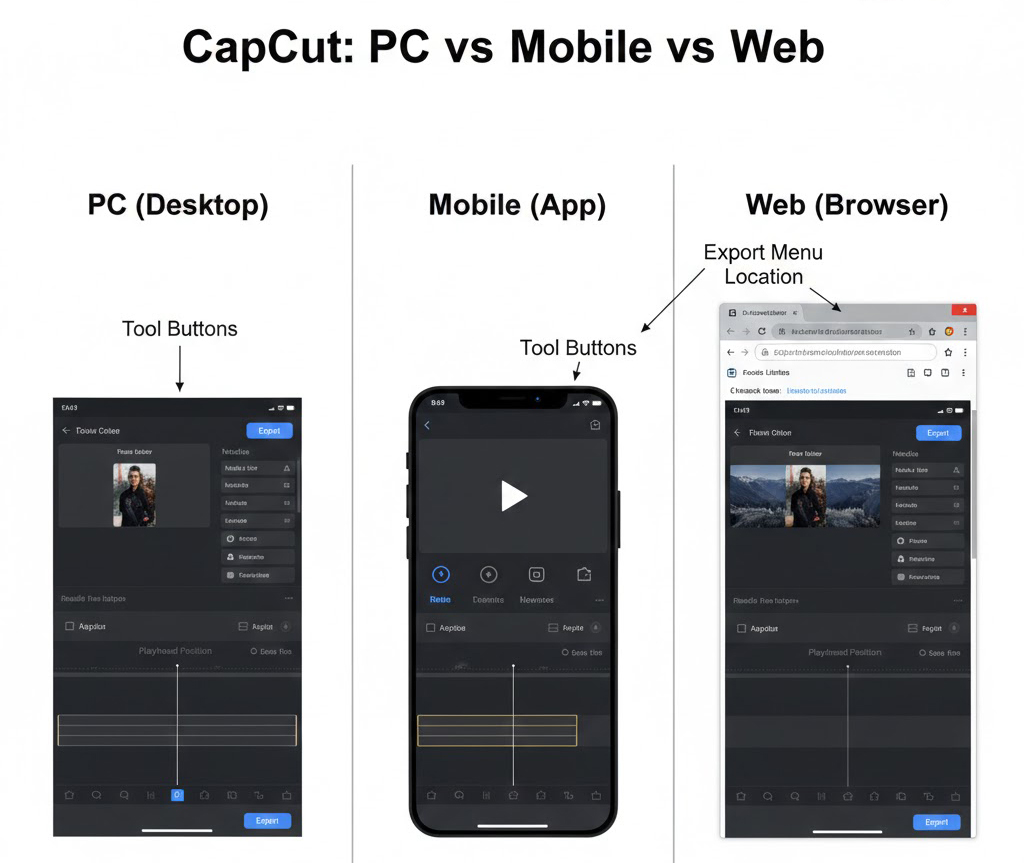
CapCut is available across desktop, mobile, and web, and each version uses the same timeline idea even when the interface layout differs. The beginner workflow on web and desktop is explicitly timeline-led: upload media, drag clips to the timeline, then trim, split, or rearrange, and finally export. On mobile, the same model applies: you add clips to a project, edit on a timeline, then export from the top controls. For timeline mastery, this matters because your transferable skills are structural (playhead control, clip boundaries, track discipline), while the exact button locations may vary by platform.
However, timeline performance can vary significantly depending on your device hardware, especially when working with multi-track edits, 4K footage, or multiple keyframes. If you experience lag, crashes, or export slowdowns, it’s often a system limitation rather than an editing mistake.
How to Trim and Split Clips in CapCut Timeline (Step-by-Step Guide)
Precise trimming and splitting is the fastest way to improve pacing, because it turns a long recording into intentional beats without changing your core footage.
CapCut’s own guidance centers on positioning the playhead at the exact point you want to change, then using Split to divide clips into smaller units you can rearrange and refine. Once clips are segmented, CapCut recommends targeted edits per segment, including trimming, cropping, filters, transitions, overlays, and effects, instead of trying to “fix” an entire long clip at once. The pro habit is to think in three passes on the timeline: first structure (splits and order), then clarity (removals and tightening), then polish (transitions, effects, and text).
How to Manually Split a Clip in CapCut (Using the Playhead Tool)
To split manually, place the video on the timeline, move the playhead to the exact cut point, and use the Split icon to divide the clip into separate sections. The manual method is explicitly described as playhead-first, then Split, then continue splitting as needed to refine flow and rearrange segments. After splitting, CapCut’s guide suggests applying transitions, effects, or adjustments per segment to keep the edit controlled rather than global. A pro-level detail is what you do immediately after the split: audition each side of the cut in context, then trim the newly created in-point or out-point until the cut is motivated by action, speech, or music rather than by convenience.
How to Use Split Scenes in CapCut (Auto Scene Detection Explained)
Split scenes is an automated option that can divide a video into separate scenes after you add it to the timeline and choose the Split scenes tool. In CapCut’s described flow, you right-click the clip, select Split scenes, and the editor separates the video into scenes within seconds, producing multiple timeline segments you can rearrange or refine. Used carefully, this is a timeline organization accelerator: it converts “one long clip” into manageable building blocks that match story beats. The professional constraint is verification: automated scene boundaries are only useful if you validate each boundary against what the audience perceives as a new moment, not just a change in pixels.
How to Convert Long Videos to Shorts in CapCut (Best Settings & Workflow)
Long video to shorts is relevant when you need multiple short-form outputs from one long recording, because it creates a shorter cut by selecting a portion and applying duration presets. CapCut’s described interface includes choosing a specific part of the video, selecting a captions template, and picking a target duration such as 60 sec, 60 to 90 sec, or 90 sec to 3 min before converting. From a timeline perspective, treat this as a first draft generator: it produces an edit candidate that still requires manual pacing fixes (cuts on breath, removal of dead air, and alignment of captions and audio). The “pro” move is to re-open the resulting short in a normal timeline project and re-check every cut point with the playhead, because short-form pacing punishes even small hesitations.
How to Organize a Multi-Track Timeline in CapCut (Pro Editing Structure)
A readable timeline is one where you can answer “what happens at second 12” without zooming into chaos: clips are layered intentionally, and each track has a purpose.
CapCut’s keyframe guide explicitly notes efficient multi-layer editing through the timeline, which implies multiple elements can be animated and adjusted simultaneously. The beginner guide also calls out timeline organization as a practical habit, because an organized timeline reduces the time you spend searching for sections during revisions. Pro editing is less about speed and more about reducing error probability: clean track structure prevents accidental desync, unintended overlaps, and editing the wrong layer.
Best Way to Structure A-Roll, B-Roll, Overlays and Text in CapCut
A workable structure is to reserve one primary video track for A-roll, then place B-roll, overlays, and text on separate tracks so timing edits do not accidentally change visual priority. CapCut’s workflow encourages adding text, transitions, effects, filters, and background music as distinct edit components after you have your clips arranged on the timeline. If you add Auto captions, treat captions as a dedicated text layer whose timing must be audited like any other layer, not as decoration. The key is intent labeling in your own mind: if a track exists, it should answer a single purpose (story, emphasis, information, or mood) instead of mixing roles.
Why Timeline Drift Happens in CapCut (And How to Fix Sync Issues)
Misalignment usually comes from changing one clip’s duration without understanding what else shares that time window, especially when audio, captions, and overlays must remain synchronized. CapCut highlights balanced audio as a core beginner concern, and imbalance often signals that audio clips have been cut or moved without corresponding timeline checks. Similarly, after splitting, CapCut notes you can refine each segment by aligning audio and adjusting duration, which is a direct acknowledgment that cuts create synchronization risk. In professional practice, you prevent drift by doing micro-checks: after every major trim or split, scrub the playhead across the cut and confirm lips, captions, and sound cues still line up.
How to Use Keyframes in CapCut to Create Smooth Animations
Keyframes make motion, fades, and parameter changes predictable, because they define how properties evolve over time between explicit points on the timeline.
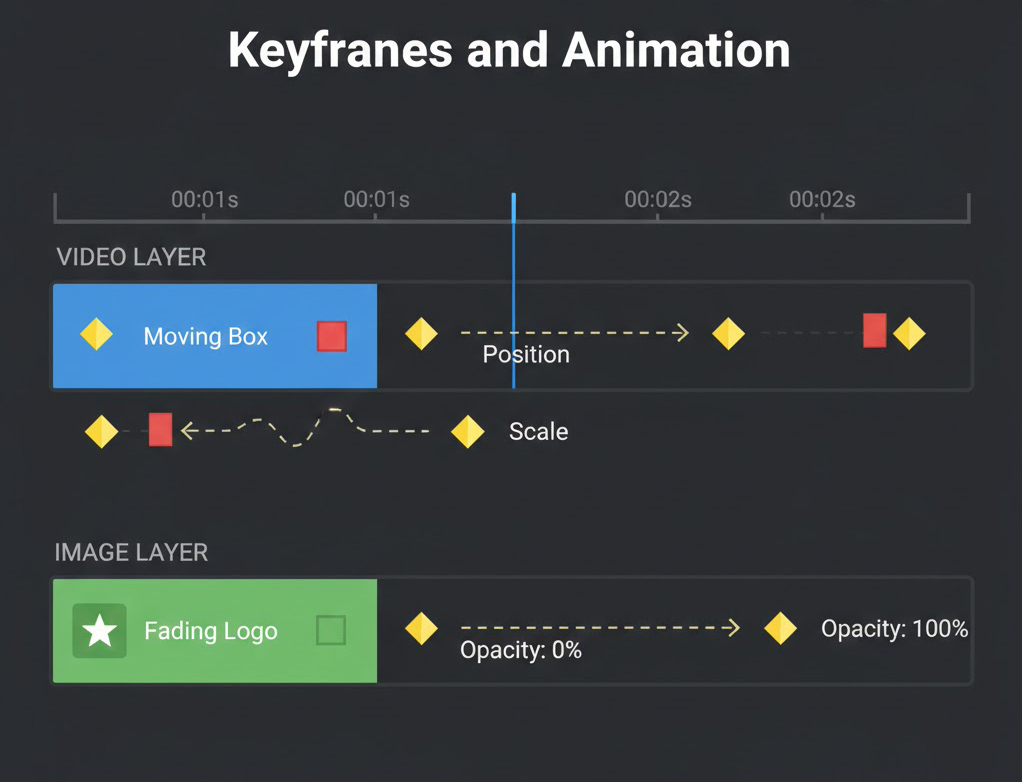
CapCut describes keyframes as the foundation for smooth animation, enabling control over movement, scale, rotation, opacity, effects, and even audio properties frame by frame. The timeline implication is straightforward: a keyframed change is time-anchored, so your animation becomes editable in a way that simple “set-and-forget” adjustments are not. If your edits feel amateur, it is often because changes happen instantly (hard jumps) instead of evolving across time; keyframes are the tool for converting jumps into intention.
Types of Keyframes in CapCut (Position, Scale, Rotation, Opacity & Audio)
CapCut’s keyframe guide lists position keyframes, scale keyframes, rotation keyframes, opacity keyframes, effect keyframes, and audio keyframes as distinct types. Position keyframes control motion paths across the screen, scale keyframes control zooming, and rotation keyframes control orientation changes over time. Opacity keyframes handle fades, effect keyframes animate parameters like color or brightness, and audio keyframes control sound properties such as volume or balance. In timeline terms, these map to “what changes” (the parameter) and “when it changes” (keyframe placement), and the quality of your edit depends on how tightly those two are aligned with story beats. Some advanced animation controls, export quality options, and AI-powered features may differ depending on whether you’re using the free or Pro version of CapCut.
How to Add and Edit Keyframes in CapCut PC (Desktop Guide)
In CapCut PC, the described workflow is to select a clip on the timeline, locate the diamond icon beside a parameter like Position, Scale, Rotation, or Opacity, and click it to insert a keyframe at the playhead location. You then move the playhead to a new point, adjust the same parameter, and CapCut generates the transition between those keyframes. CapCut also notes that adding more keyframes refines speed, direction, and style, which is the practical lever for making motion look controlled rather than random. When you are editing “like a pro,” you spend more time choosing fewer, cleaner keyframes than stacking many corrective ones, because each extra keyframe adds complexity you must later maintain.
How to Control Animation Speed in CapCut (Keyframe Spacing & Easing)
Perceived speed is determined by how far apart keyframes are on the timeline and how different the values are between them, so spacing is a first-order control for motion feel. CapCut’s guide explicitly links keyframe spacing to speed changes, noting that adjusting the distance between keyframes changes the speed of the animation. It also mentions Ease In and Ease Out as options to smooth transitions, which is the mechanism for removing mechanical-looking motion. Practically, you use easing when you want the viewer to accept motion as natural (gentle starts and stops), and you use tight spacing when you need an intentional snap for emphasis, but only when that snap matches the content beat.
How to Sync Audio, Music and Captions in CapCut Timeline
Synchronization is the discipline of making dialogue, music, sound effects, and on-screen text agree on timing, so the viewer never has to reconcile conflicting cues.capcut+1
CapCut’s tips for splitting explicitly call out aligning audio and refining timing after dividing a video into segments, which is an acknowledgment that segmentation creates sync work. The beginner guide also flags balanced audio across background music, voiceovers, and sound effects as essential, and imbalance is often a timeline timing problem, not just a volume slider problem. When you add captions, sync becomes tri-modal: what is heard, what is seen, and what is read must all share the same timestamps.
How to Use Audio Keyframes in CapCut for Smooth Volume Transitions
Audio keyframes let you control sound properties like volume or balance at different timeline points, enabling smooth fades rather than sudden jumps. CapCut describes audio keyframes as a way to fade audio in or out smoothly and match sound intensity to visual motion, which is exactly the “professionalization” step for timeline audio. The practical workflow is to set a keyframe before a change (for example, before dialogue starts), then set another at the target level, creating a controlled ramp instead of a hard cut. This is also the cleanest fix for background music that masks speech: you do not remove the music, you shape it across time.
How to Use Auto Captions in CapCut (Editing & Sync Guide)
Auto captions are generated by navigating to Text, selecting Auto captions, and generating captions that sync to the video, after which you edit the text to ensure accuracy. CapCut’s auto caption page also frames automatic captions as an ASR-based process, meaning speech is transcribed into text via automated speech recognition software. On the timeline, the operational point is that captions are timecoded elements, so every cut and every moved clip can create caption timing issues that must be reviewed with the playhead. If you are exporting subtitles as a separate deliverable, treat the caption layer like any other critical track: scan start, middle, and end timestamps for drift introduced by edits.
Best Caption Settings in CapCut for Readability and Engagement
Readability comes from choices like keeping captions synchronized to speech, using consistent formatting, and avoiding style changes that compete with the edit rhythm. CapCut notes you can customize subtitles by changing text style, format, font, color, effects, and motion, so style is adjustable but should be constrained by clarity goals. The timeline consequence is that overly animated caption motion can add visual beats that conflict with your cuts, transitions, and overlays, especially in short-form edits. A professional rule is to make caption styling predictable and reserve motion for information hierarchy (for example, emphasizing a keyword) rather than for constant animation.
Best Export Settings in CapCut (Resolution, Bitrate & Quality Guide)
Export quality depends on matching timeline intent to output settings, then verifying the rendered file for mistakes that are easy to miss inside the editor.
CapCut’s splitting guide describes export as a final step where you choose settings including resolution, format, and quality level before saving. It also explicitly mentions advanced export controls like bitrate and codec, and even the option to change resolution up to 8K, which shows that timeline work is only half the job if export choices are careless. The beginner guide echoes the same structure across platforms: edit on the timeline, then export with your chosen settings. Professional editing treats export as a technical deliverable stage, not as a button press.
CapCut Export Settings Explained: Format, Resolution, Bitrate & Codec
CapCut’s guide references common formats such as MP4 and MOV and frames export as choosing resolution and format appropriate for the final file. The splitting guide adds that you may adjust bitrate and codec during export, which are the two parameters that most directly influence compression behavior and playback compatibility. Resolution matters because it determines the pixel dimensions you deliver, and CapCut notes the ability to set resolution up to 8K in its export settings. In timeline terms, your export settings should preserve what you built: if your edit relies on fine text, subtle effects, or small overlays, aggressive compression can damage the very details you spent time aligning.
Final Timeline Checklist Before Exporting in CapCut
A reliable QA pass is to play the timeline from the beginning to the end to catch issues like audio mismatch, sudden changes, or unwanted sections, which the beginner guide explicitly recommends as “preview before export.” After splitting, CapCut also recommends refining details by aligning audio and adjusting duration, which is effectively a QA directive specific to segmented timelines. Caption QA should include checking that Auto captions remain synchronized and that edits to text did not introduce timing errors across cuts. Finally, do a “track focus” scan: solo your attention on one layer type at a time (visual continuity, then audio continuity, then caption continuity) because multi-layer editing makes it easy to miss a single-track defect.
How CapCut Timeline Skills Transfer to Premiere Pro, Final Cut Pro & DaVinci Resolve
Timeline literacy transfers across non-linear editors because the underlying model is consistent: clips exist on tracks, time flows left to right, and a playhead defines what you are editing. This transfer is strongest for cutting, layering, and keyframe thinking.
CapCut’s own materials emphasize the same primitives that exist in other NLEs: timeline arrangement, trimming and splitting, transitions and effects, text overlays, and keyframe-based parameter animation. If you can maintain a clean multi-layer timeline in CapCut and avoid sync drift after splits, you can apply the same discipline in Adobe Premiere Pro, Final Cut Pro, DaVinci Resolve, and similar editors, even when terminology differs. The main difference is not whether a feature exists, but how exposed it is and how much control the UI gives you over the same timeline concepts.
CapCut vs Premiere Pro: Timeline Terms That Mean the Same Thing
Playhead, timeline, clip, track, split, trim, transition, effect, and keyframe are universal terms that map directly across most editors, and CapCut uses these concepts explicitly in its guides. Position, scale, rotation, and opacity are also common parameter names across systems, and CapCut keyframes these parameters via a diamond icon and timeline placement. Export terms like format, resolution, bitrate, and codec are also shared across the ecosystem, and CapCut references them in its export guidance. When you move between editors, the pro habit is to keep your mental model stable (time, layers, parameters) while relearning only the interface paths.
CapCut AI Tools That Don’t Exist in Other Video Editors
CapCut’s ecosystem includes workflow shortcuts such as Split scenes for automatic scene division and Long video to shorts for generating short-form edits with preset durations, which are presented as built-in pathways rather than manual-only editing. It also promotes AI-assisted tools like Auto captions and Remove background as integrated editing functions within its web workflow. While other editors may offer similar outcomes via plugins or separate modules, the timeline skill you keep is decision-making: you still must validate scene boundaries, caption accuracy, and timing coherence with the playhead. The practical takeaway is to treat automation as draft generation, then apply the same timeline standards you would use in a fully manual edit.